This overview shows the essential structures and functions of the marketing system. Among other things, it offers target group-specific differentiation of content and a variety of display options:
HTML/TEXT for on-screen display, PDF for print output, text-to-speech for reading the content aloud and with RSS feed for incorporating current information. Secure access to the software is possible at any workstation with Internet access and a web browser with password protection.
The following browsers are supported: Chrome, Firefox, Edge, Safari and Opera, provided the version used is not older than 4 years.
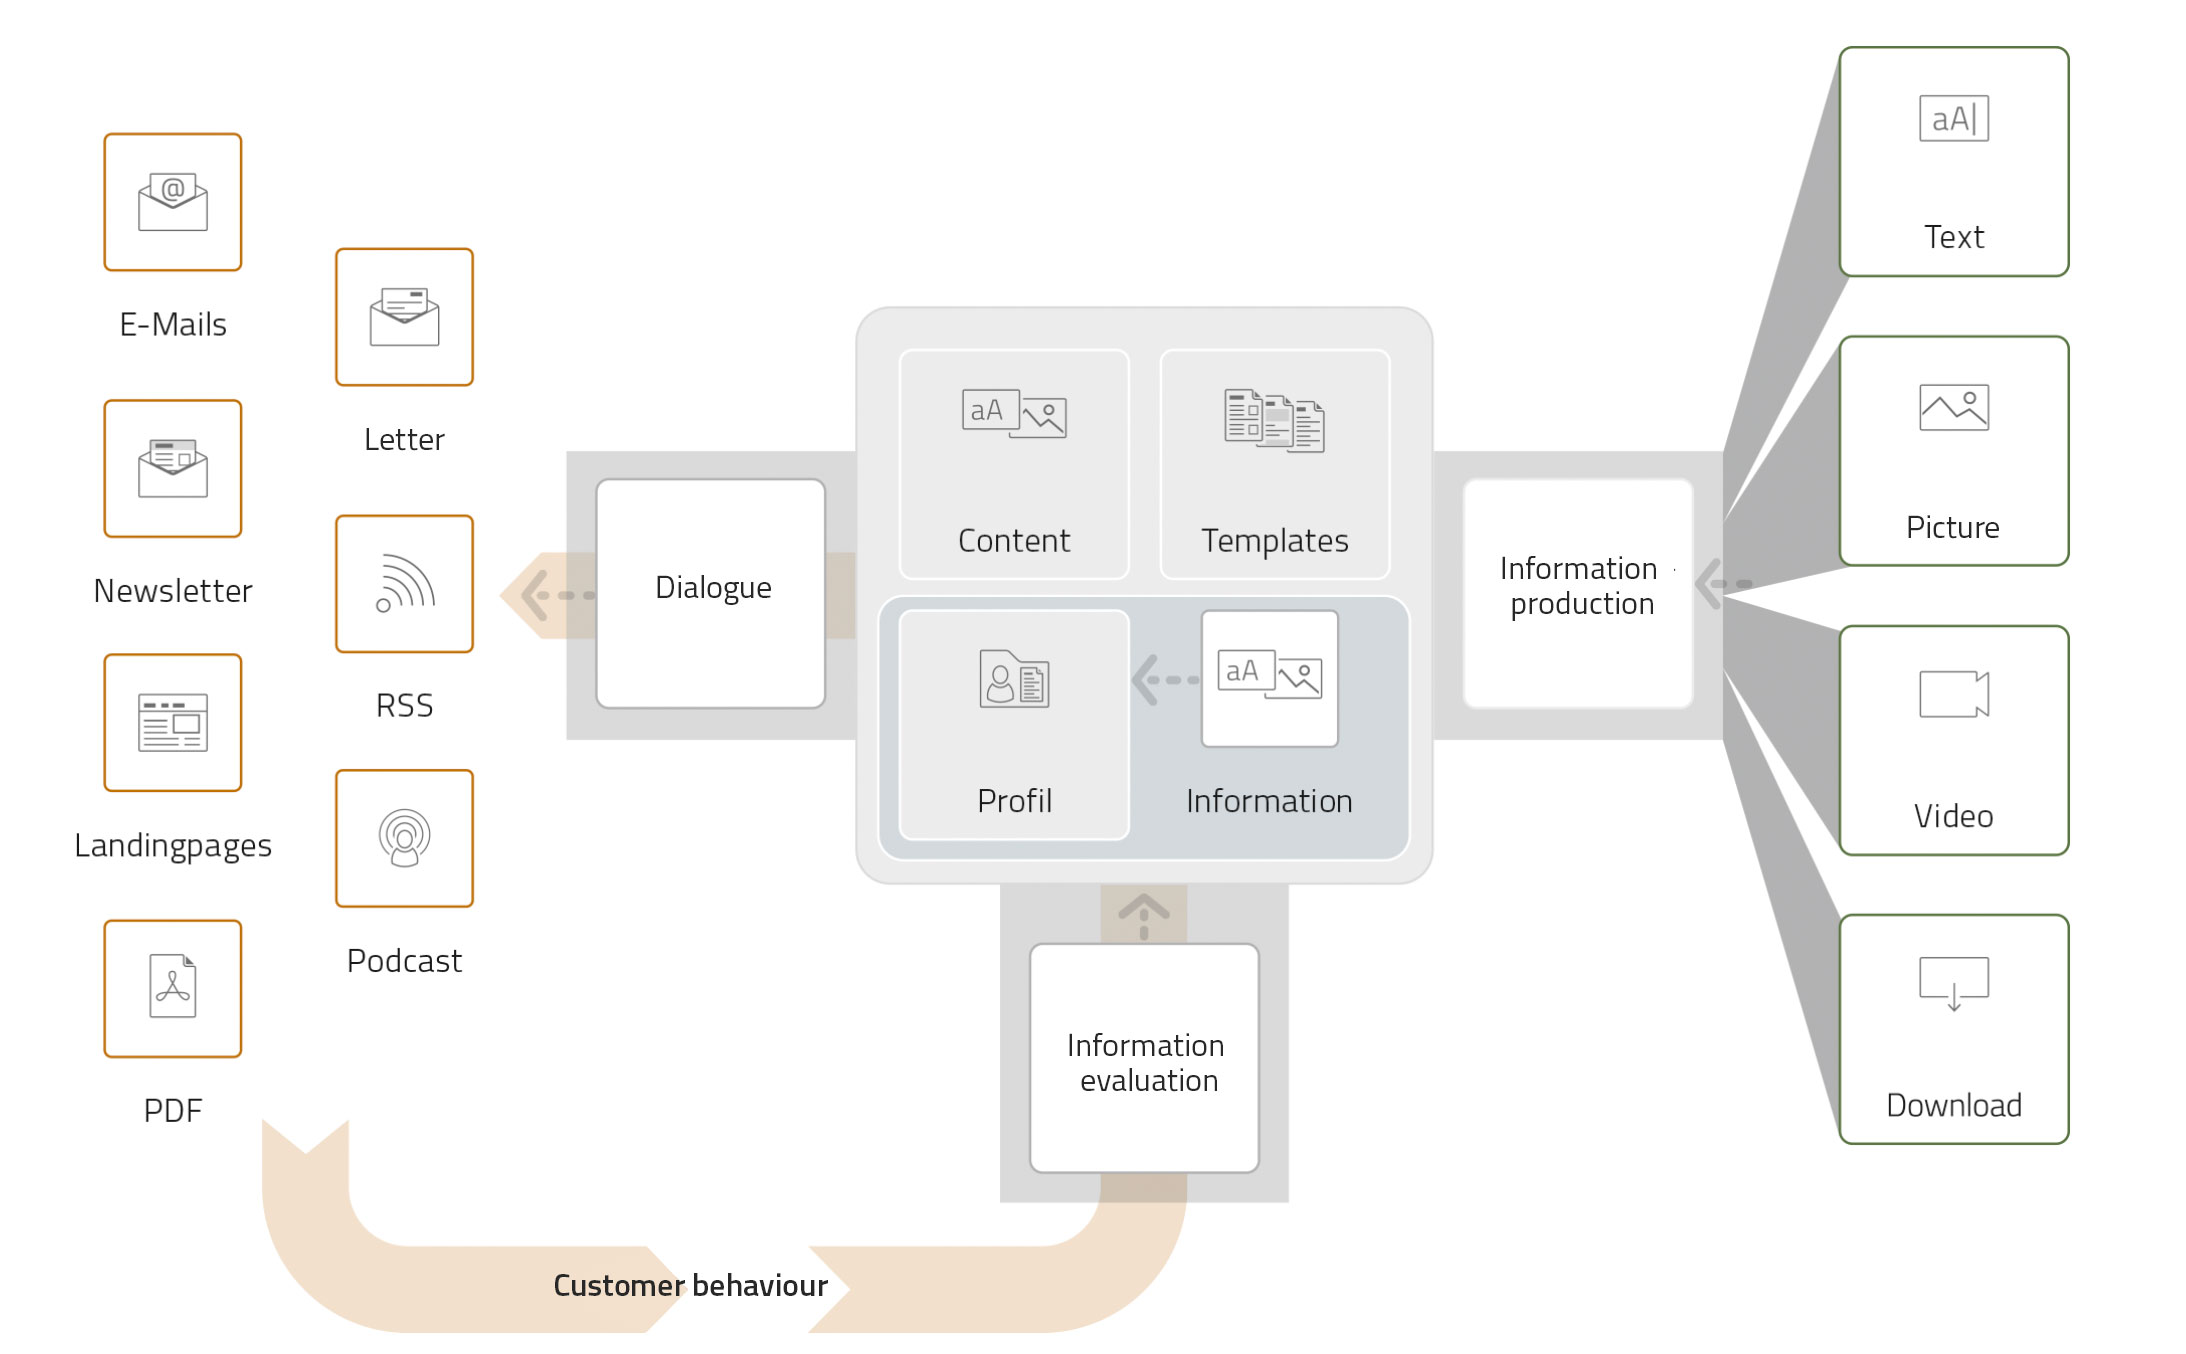
The screen shows an overview of the general system structure.
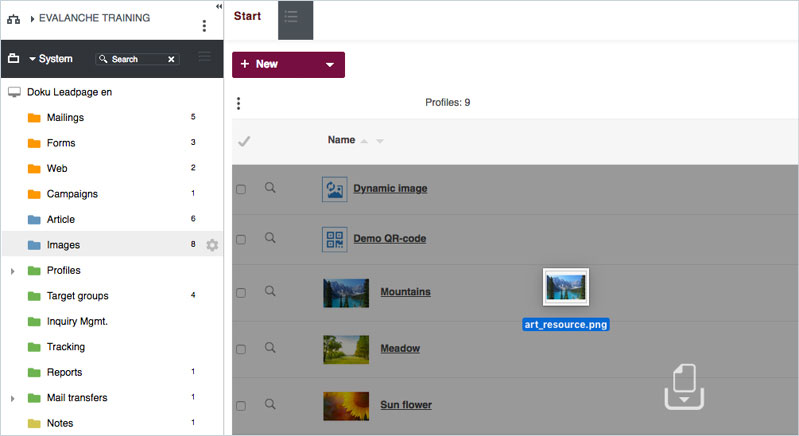
The clear folder structure of the system helps you to find your way around and supports you in managing and editing all objects - address profiles, images, texts, articles, templates, etc. can be stored in individually adapted folder structures. When using the included newsletter templates, programming knowledge is usually not required. An integrated Content Management System (CMS) allows you to work intuitively using the editing function.
System time
The internally used system time is based on Greenwich Mean Time (GMT) or Universal Time, Coordinated (UTC) - the international system time. All time data in the system interface must be converted accordingly, i.e. for the German-speaking area (DACH): winter time (CET) +1 hour, summer time (CEST) +2 hours.
Example for DACH: The start time for an e-mailing was configured to 10:00 a.m. in summer time and was sent there. In this case (summer: -2 hours) the displayed sending time of the successful sending is 08:00 according to the system time. For the same start time in winter (-1 hour), the displayed time of dispatch is 09:00 system time.
User interface
Home page
After successful login, the start page of the system is displayed. It offers you access to all objects and functions for the planning, execution and quality control of eMailings. The start page consists of four areas - the logo bar at the top, the folder navigation on the left, the tab navigation and the so-called desktop on the right.

The start page contains the logo bar, folder navigation, tab navigation and the desktop with the icon-based DeepL access, this view can be switched to the extended display.
The left pane shows the folder structure (folder navigation) with all functions for the content and structural management of objects and information in the system.
You can find support for questions about system usage under the menu options Help and ?. Mail inquiries are possible via the Support menu item in the top right corner. Context help for individual functions can be called up directly at the appropriate places via small ?
Folder and register structure
Logo bar
At the top of the logo bar you can change your access data, make support requests or call the help center.

Your user name - serves for the administration of your profile, with a click on it you get to your settings.
National flag - changes the system language - you can choose between German, English, French, Spanish and Italian.
Support - leads to a request form for sending requests and error messages to the support team.
Help - provides information on all topics related to system usage.
Fullscreen - switches to full screen mode.
Logout - Logs you out of the system and logs you out.
Tab navigation
On the start page and other pages in the system you will find the so-called tab navigation above your workspace. You can use this navigation to call up all editing options for the respective objects using the navigation tabs.
The following navigation tabs are available on the start page:
Desktop, with icon-based quick access
Flowchart, with the most important system objects and their flowchart
Statistics, shows the status of all profiles in the pool.
Calendar, shows the activities in your account such as dispatches and limited forms.

The tab navigation is available individually for each object in the system.
Desktop - shows the icon-based DeepL access with the essential objects and functions of the system. A click on the icon shows you all existing objects of this type, a click on the + creates a corresponding object.
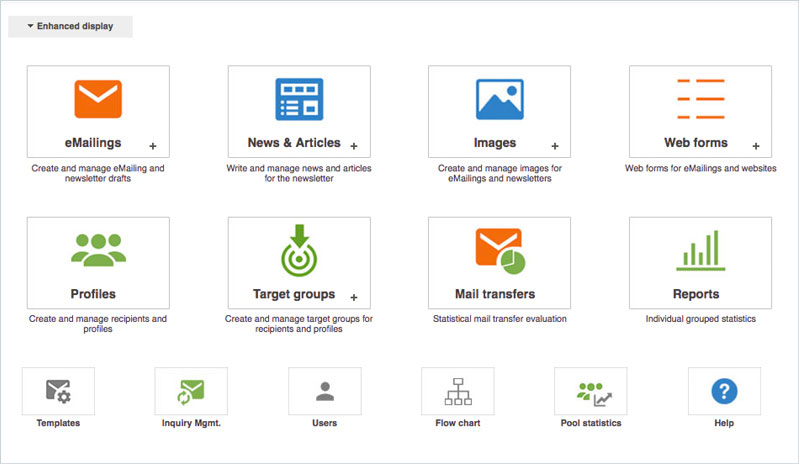
The icon-based quick access takes you directly to the object folder, or you can create an object directly by clicking on +.
Flowchart - shows in graphical form the linkage of the most important system objects as a process flow diagram. All objects from the current configuration of the client and their relationships to each other are displayed. You can click on the objects to go directly to the object.
Statistics - summarizes the properties of the profiles in the databases in clear tabular form and as bar or pie charts.

The statistics display the composition of the profiles in the pool.
Calendar - shows e.g. an overview of the dispatches in your account. With the calendar you can see when a mailing was sent, with a click on it you get directly to the sending object.
The following data is displayed in the calendar:
- eMailing dispatch: Shows the time of a dispatch as a two-hour event.
- eMailing dispatch (scheduled): Shows the scheduled time of a dispatch as a two-hour event.
- eMailing (Event): Shows activated event emailings as a full day event from the time of activation.
- Form with time limit: Shows the time span of a time-limited form.
- Note: Displays the note as a two-hour event if a date has been specified in the note.
- eMailing Release: Shows the time for a release process as a two-hour event, if a date was specified in the eMailing.
- eMailing Deadline: Shows the time for an editorial deadline of an e-mailing as a two-hour event, if a date was specified in the e-mailing.
- Split campaign: Shows the time of a split campaign dispatch as a two-hour event.
Folder structure
The system has various objects for processing and structuring information. These objects can be stored hierarchically in folders. The folders are used to structure the objects required for e-mailing. The order of the folders in the list can be moved easily by drag-and-drop. See Creating and Editing Folders.
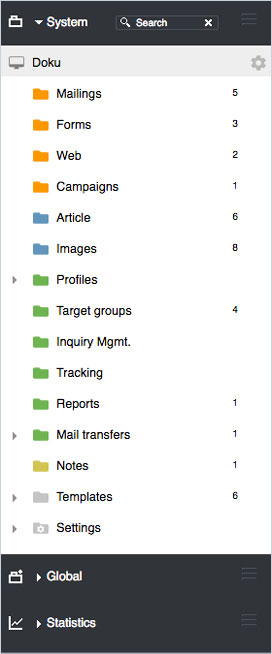
Main folder System

This folder contains the following subfolders:
eMailings: Administration of eMailings - This is the central area where you can create new newsletters and eMailings based on templates, edit their content and send them.
Article: Management of article and news content - Here you create new articles and manage them for further use and integration in newsletters and e-mailings. Standard articles always have the same structure with a short and a long text version. This ensures an optimized presentation via the cross media formats Newsletter-HTML, Newsletter-TEXT, Newsletter as website, News-Site, PDF and RSS as well as Podcast and reading aloud via speech synthesis (Text-to-Speech TTS). Once articles have been created, they can be used several times in different e-mailings.
Pictures: Image management - In this area you can import and manage new images for e-mailings and articles and classify them with additional information such as usage rights. Supported formats are .jpg, .png and .gif. The resolution should be suitable for a high-quality cross media display on the screen and in PDF print format. The system generates a suitable scaling of size and resolution for web and print presentation fully automatically.
Web Forms: Administration of contact and order forms - Here you create and design web forms for address generation according to your design specifications. For CI-compliant integration into existing websites, you are largely free to design a form. The number and arrangement of the input fields can also be individually adapted.
Profiles: Administration of address profiles - Here you maintain and administer your address lists of customers and prospective customers. Entries can be created by data import, input via web forms or manual input. You can adapt and extend the data structures of a pool in the database for further profiling if required.
Target groups: Management of target groups - In this area you can define, set up and edit the content of target groups. Target groups are the central communication control to send eMailings (with individualized contents) to different recipient groups (target groups). Target groups can be defined across your entire address pool. For this you can use any number of comparison operators of properties, e.g. target group A: Salutation = Mr. AND Hobby = Golf AND ZIP code >= 20000 AND ZIP code <= 69999.
Shipments: Dispatch history of sent eMailings - In this area the sent eMailings are stored automatically as dispatch object. For the evaluation of the eMailings click on the appropriate eMailing in the list.
Reports: Administration of statistics or reports - In this area you can create and edit new reports. A report consists of a grouping of several partial statistics - e.g: How was the dispatch process and the development of the address list during the last e-mailings over a defined period of time?
Request Mgt: Management of requests that arrive via web forms and lead to profile entries in a pool. This allows you to define the subsequent flow of information and workflows for different people in order to forward incoming orders, contact requests, etc. quickly to the relevant groups of people.
Web: Here you can manage and edit websites, landing pages, news sites, RSS/Atom feeds, RSS/Atom feed readers and smart links.
Tracking: In this folder, you manage and maintain SmartLinks and WebTouchPoints that are integrated into your emailing and web pages. You can use the Post Click Tracking tool to monitor the use of tracking objects.
Templates: Management of e-mailing and article templates - Here you manage your templates for different purposes, e.g. for newsletters or cross media e-mailings.
Notes: Here you can create notes and assign objects - e.g. the note that a template may not be edited.
Settings: This folder offers all functions for account and user administration. Access to this area is only possible with the corresponding access rights. Here user accounts can be set up and corresponding roles assigned - with clearly defined access rights. Multiple roles can be assigned to each user. If required, the appearance of the user environment can be adapted to the respective CI with the usual individual look and feel. This area is also used for the administration of client data.
Main folder Help

This folder contains quick start points for important and frequently used parts of the documentation such as video tutorial, object overview and current information about updates.
Main folder Statistics

Here you can track statistics on the development of your current address list in a compact form: e.g. total entries, entries in the last 7 days and subscriptions.
Main folder Notes

If you create a new note for an object, it is stored here by default.
Main Folders Favorites

Your favorites and a list of the most recently used objects are displayed here. By clicking on the name, the system immediately jumps to the selected object. The favorites can be re-sorted using Drag & Drop.
Main folder Global

All objects that were created at group level in the Global Data folder are displayed here. These can be templates, images or articles, which you can include in the respective client in articles, eMailings, etc..
Main folder Reports

Here you can select all reports of your group and activate them for a graphical display.
Folders and objects
List display
You can use the folder structure to access all objects in the system. A click on one of the folders - e.g. pictures - opens the list view with all contained objects, organized by default in pages of 30 objects each. In the default configuration, the last saved file appears first, in descending order of the objects. The order of the lines can be adjusted with the up/down arrows next to the headings in ascending or descending order. The column display can be adjusted individually and saved permanently. The list icon Icon_Liste.jpg is located in the upper left corner of the lists to display the columns. A click on this icon opens a popup window in which all columns can be selected individually by checkbox. A click on the Save permanently button replaces the default configuration for this list with the selected individual configuration.
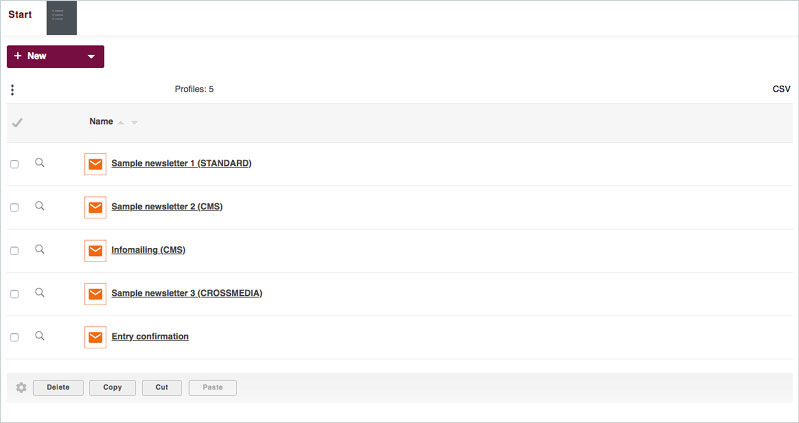
In the list view, the objects within a folder are displayed. By default, the last saved object is displayed first.
Lock object or attach note.
In the editing mask and the gear in the list view, objects can be locked, locked for external access, or notes can be attached.
Note available: This object has an attached note.
External access blocked: External access to this object via the integration URL is locked,
Object lock: An object lock is active for this object.
Upload files via Drag & Dop
Objects such as pictures, files or web pages can be simply dragged and dropped from the desktop into the list view and uploaded. Only files up to 10 MB can be uploaded to the system. Please upload only necessary files into the system.
Simply drag the desired file from your computer into the list view to load the file into the system.
Creating and editing folders
To create new and edit existing folders, click on the gear icon behind the selected folder in the navigation on the left. A pop-up window opens.
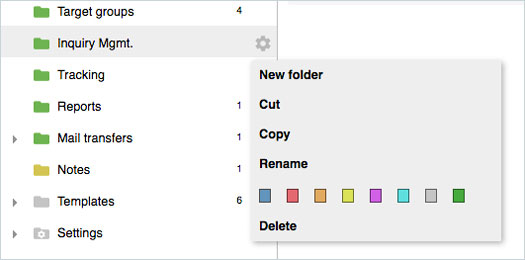
A click on the gear opens the machining menu.
The following machining options are available:
New folder: Allows you to create new folders. A new folder is always created below the currently selected category.
Cut/Copy/Paste: Folders can be copied or moved with all objects contained in them. This also works across clients. Please note that if you move folders, errors or unwanted results may occur with fixed object paths or integration URLs.
Rename: To change the name of the folder, select Rename from the pop-up menu. All folders can be renamed with the exception of the following system folders: The main client folder, the main group folder, the shipping folder and the shipping subfolder.
Assign color: The color of a folder can be determined by assigning a different color. This allows you to easily create visual groupings and quickly find important points in the folder navigation.
Delete: If you want to delete a folder, click Delete in the popup. A folder must be empty to be deleted.
Creating and editing objects
Button + New: To create new objects, a page opens with fields for entering the object name and, if necessary, a dropdown list for importing, creating or selecting resources.
If you want to create a new object, click on the + New button, a window opens with a selection of objects that you can create in the respective folder. This selection can change depending on the folder.
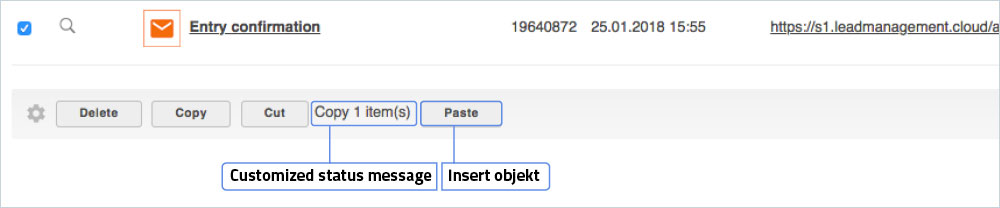
Delete, copy or cut objects
Objects can be copied or moved at will. In the list view you will find the corresponding buttons at the bottom. To copy or move an object, select it by checking the box to the left of the object. Then click on Copy or Cut. Open the folder to which the object is to be copied or moved and then click Paste. The object is then displayed in the list view of the destination folder.
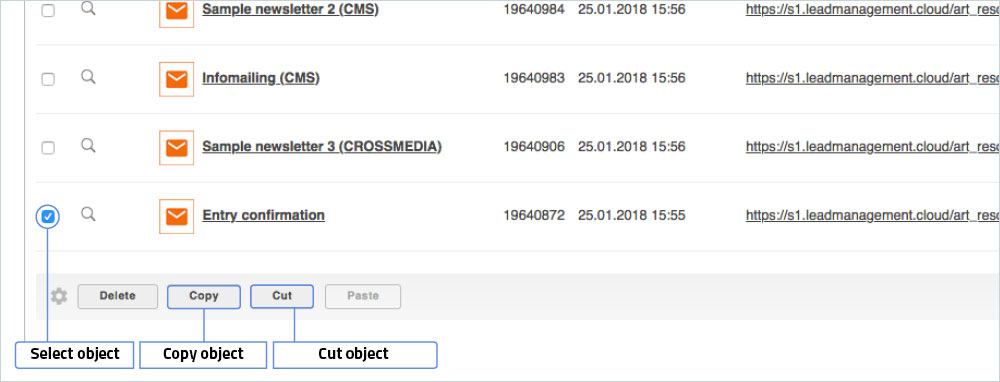
If you want to copy or cut an object, select the object and choose the desired action.
Then go to the desired folder and click Paste.
Note!
When copying objects, new object resources with new IDs are created. However, the existing configuration data is also copied, which then refers to existing objects. When copying objects for new scenarios, you must then adjust the configurations of the copied objects accordingly!
Delete objects
To delete an object, select it by clicking the checkbox and click Delete. The system checks whether this object is linked to other objects. Found links are then displayed. There are critical and non-critical links. Critical links must be removed in advance in order to delete the object. Objects with non-critical links can be deleted without removing these links. Links are e.g. pictures in articles or articles in eMailings.

To delete an object, mark it with the checkbox and click on delete.

If an object has a critical dependency, it must be removed first. This means that you may have to remove an item from an e-mail before you can delete it.
Create working copy
When you have selected a file, click on the gear below the list view and select Create Working Copy. This function allows you to create a working copy of the selected objects (this option is not available for all object types).

In a working copy you can make changes, the original is only affected when you assign the working copy to the original.
Lock and unlock object
If you have opened an object, you can lock this object and determine which user can unlock the object again. You determine whether a user can unlock objects in the role of the user by granting or withdrawing the lock/unlock authorization for the object.
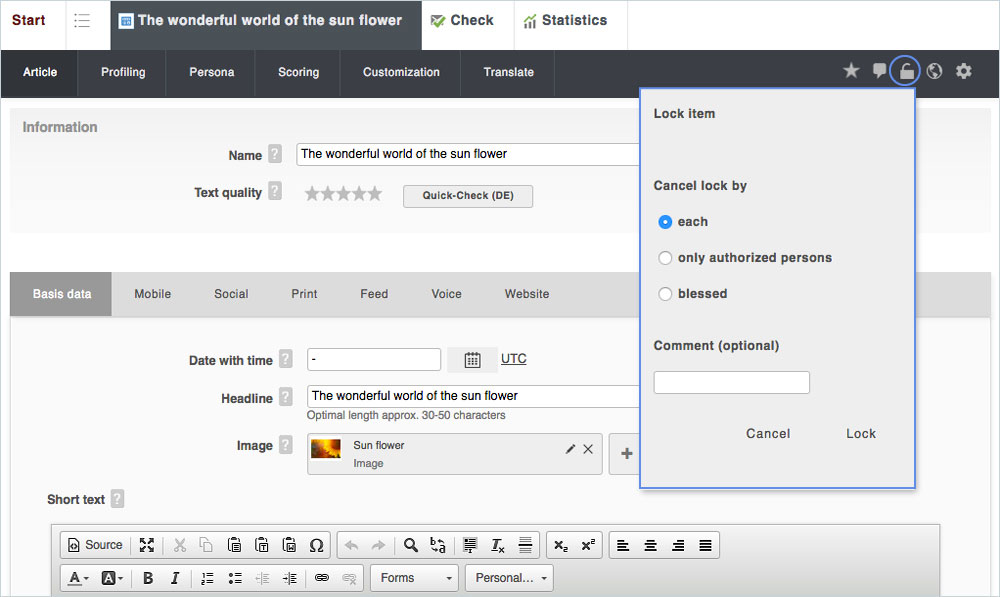
If you have opened an object, you can lock this object and determine which user can unlock the object again.
Prohibit / allow external call
The "Prohibit external call" function blocks access to the selected object from outside the system.

If you want to prevent the external call, for example of outdated articles, you can redirect to an empty page or your own URL.
Warning!
In many cases the processing of objects (e.g. newsletters, statistics and templates) goes beyond several tabs. When changing a navigation tab, no data is saved. This happens only after explicitly executing the Save action. Click on Save to finish editing the object. In a few exceptional cases, early data transfer is possible for reasons of clarity - in these cases, the system informs you of this.
Managing object relations with the Object Picker
The central input element of all object relationships within the system is the object picker. Relationships between objects such as the image of an article or the target group of an emailing are assigned using the object picker and can therefore be created or edited directly. By clicking on the button, the last edited objects are displayed in a list with a small preview. Within the list you can either scroll through the list using the arrows at the beginning and end of the list, or scroll through the list using the mouse wheel.

To select objects from the folder structure, click either twice on the button of the object picker or on all displays and your usual folder navigation appears.
If you hover with the mouse pointer over the preview icon for a few seconds, you will see a detailed preview of the object. For example, you can see the current configuration and profile-relevant information for a target group.
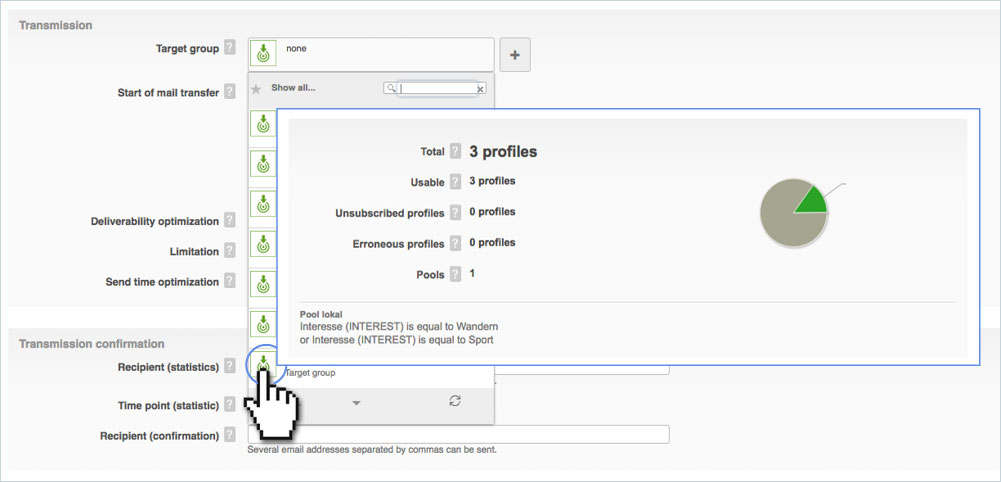
All important information about an object is shown to you via the preview icon, without you having to open the object.
The pen icon is located on the right-hand side of the selected object in the object picker. A click on it takes you directly to the selected object and you can edit it.

A click on the edit icon takes you directly to the object displayed in edit mode.
If there is no suitable object in the system or you would like to upload a new image for an article, click on the large + behind the current selection. A pop-up will open where you can choose which file you want to upload and a window where you can select and save the file for upload. The new object is only selected and usable directly in the object picker.
If you want to remove an existing link or an image from an article, click on the X symbol to delete the current selection. Only the link between the two objects will be deleted, not the selected object itself. Also note that some assignments are necessary and therefore only one other object can be selected.
Create and manage clients
Creating a new client is only possible with the right Create customer/client. If you have the right, click on the account name in the upper left corner and switch to the global level. In the New Client navigation tab, you reach a form for entering the new master data. After saving the data, the system sets up a complete sample environment for this new client.
You can edit the name of the client in the client by choosing Settings/Account. If a client is to be deleted, this is only possible on the global level under the Group tab. To do this, click on the gear symbol for the relevant client and then on Delete. For security reasons, the system asks whether you really want to delete the account before deleting it.
Global dispatch overview
On the start page of the global overview, an overview of all shipments of the group is offered under the Shipments tab. There the sent eMailings of all clients are summarized in a list. Clients that have already been deleted are not taken into account.
Automatic logout
If you are not active for a long time after logging on, the system automatically logs you off. Before you can continue your interrupted work, you must log on again. The data entered up to this point is not lost. The system saves the current status so that you can continue your work seamlessly. Only files that you uploaded before the automatic logoff and did not explicitly save are lost. After logging on again, check whether your data is correct and upload any affected files again.
Access authorization
If you do not have access authorization for certain areas and functions, the system displays this on the login screen. Only a system administrator with correspondingly higher user rights can set up access authorizations for privileged areas and functions for you.
See also: The user interface