If there are several profiles with an identical e-mail address in a pool, this can lead to ambiguities and inconsistencies. These superfluous profiles can also be costly. In order to clean up the duplicates, the cause of the duplicate source must first be determined and switched off. If possible, the relevant fields or criteria should be determined by which the unwanted duplicates can be distinguished from the desired profiles. Unfortunately, you will usually not be spared manual processing or marking of the duplicates. In an external database application you can sort the profiles and mark the profiles to be deleted with a flag. In any case, it is important to consider the status of permission or deletion when marking the profiles. Under certain circumstances, the date fields (entry, deletion, change) must be used as decision criteria.
If the duplicates have existed for some time, please note that it may well be that the profile history of a duplicate profile is distributed among several of its duplicates. Profile values set by forms may also differ for the individual duplicates of a profile. This should be taken into account during manual preparation for the marking of duplicates and the subsequent deletion of unwanted duplicate profiles.
That's the best way to go about it:
- Creating the target group with the duplicates
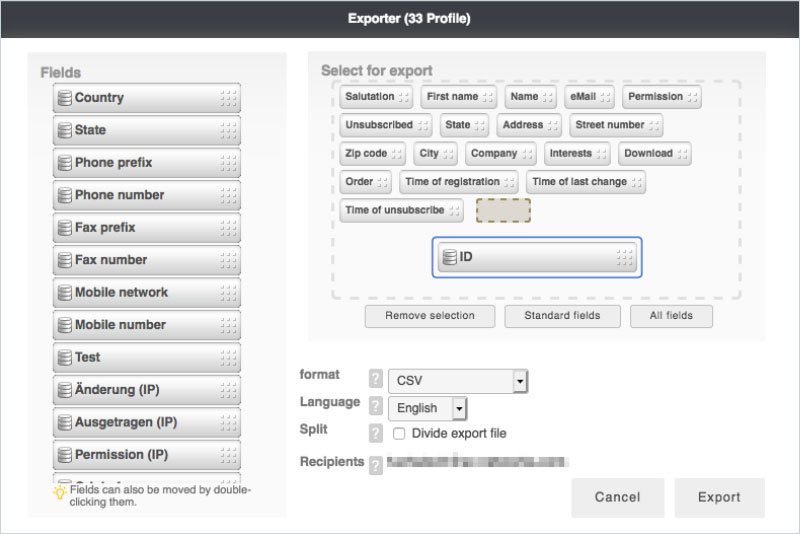
- Export duplicates with all relevant fields and the profile ID
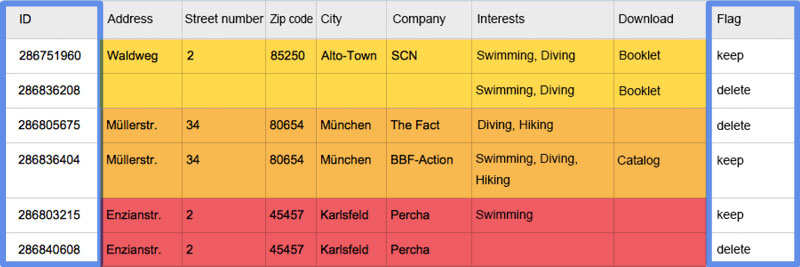
- Merge and select profile entries
- Import profiles again
- Create target group with superfluous profiles and delete profiles
1. create target group with duplicates
Create a target group with the criterion "eMail duplicate is available" in order to record all duplicates available in the pool in the first step.
2. display and export an overview of the duplicates
In multiple profiles, different information may be present in each profile. Therefore, you should display all fields in order to decide which fields are necessary for the export and which are not.
Export duplicates
Export all relevant pool fields.
The following fields should always be exported:
- Profile ID
- Name
- First name
- Discharged
- Permission
- Time of registration
- Time of execution
- Time of last change
- Fields of interest
You need the profile ID to be able to reassign the enriched profile to the profile in the pool.
Select fields for export
Drag fields you want to export to the designated area. After you click Export, you will receive an email with a download link that is valid for 24 hours.
Prepare duplicates
Sort and select the superfluous duplicates in an external database application (e.g. sorting by date of change, taking into account the status of deletion).
Copy the information from an unconfirmed profile to a confirmed profile from which you have permission so that the collected information is not lost. The change date indicates which profile should be retained. You then add a selection column to this table, which you can use to select the profiles to be deleted. Before the revised profiles are imported back into the pool, a field must be created for the selection in the pool. You can use this field to select the profiles to be deleted in a target group and delete them from the pool. If you only want to remove the duplicates, it is sufficient if the import file only contains the profile ID and the selection flag. System fields such as the deletion, permission, or change date should not be imported again if possible.
Import the formatted list with the uniqueness criterion Profile ID and the selection characteristic.
(The characteristic must also be created in the pool first!). It is sufficient to import a table which only contains the profile ID and the selection flag. You then create a target group in which all profiles are collected that contain the deletion flag. With this target group you can remove the contained profiles from the pool via the Delete data tab.
Consolidate profile data
Select the profiles uniquely so that you can select them in a target group.
Edit profile data
After you have merged the existing information of the duplicates in a confirmed profile and deleted the superfluous columns, you can import this file again. To assign these profiles to the profiles in the pool, you need the profile ID.
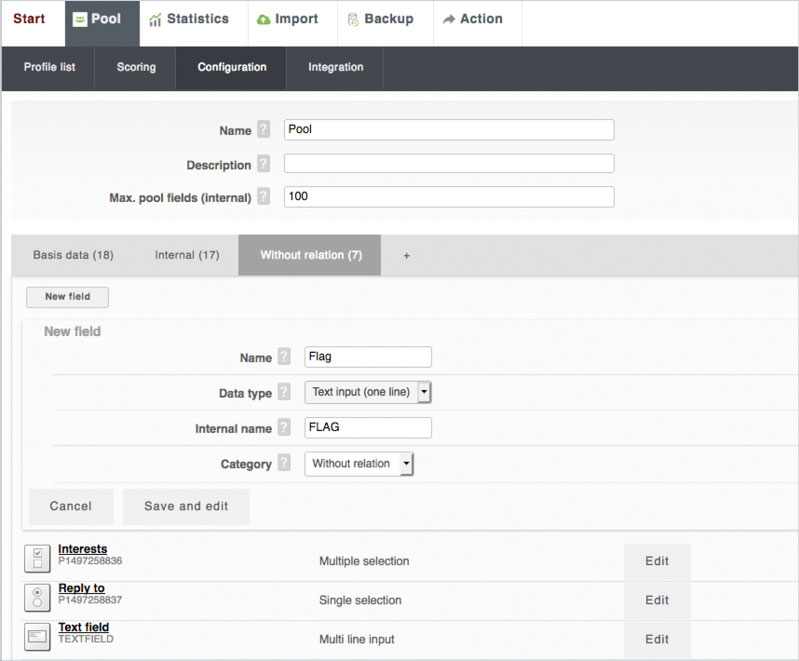
Create field for selection
Before the profiles can be imported, first create a new field in the pool, with which you can select the profiles to be deleted.
Create a field with the appropriate data type in the pool to select the profiles using this field. In this case it can be the data type "Text" with a "Single line input".
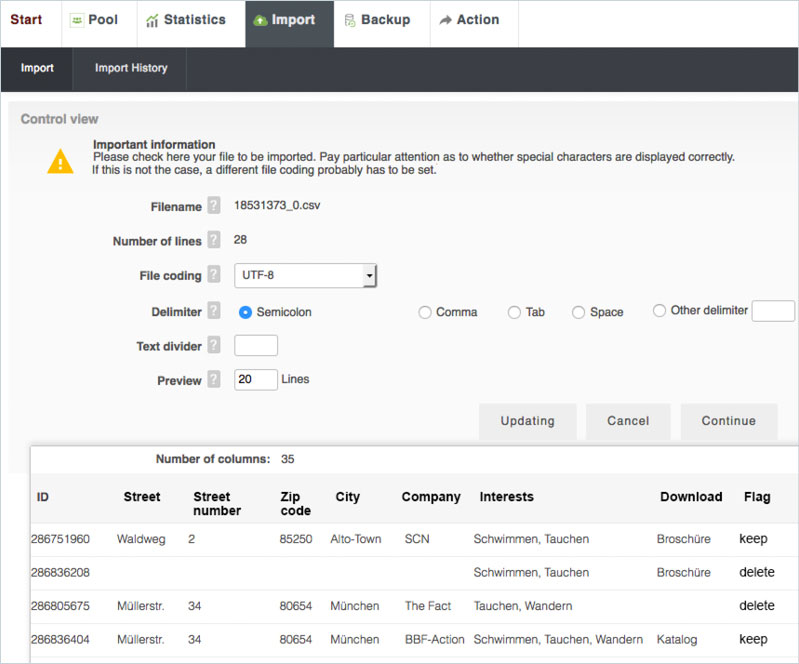
Import file
When you import the profiles back again, pay attention to the appropriate file encoding (UTF-8) and the correct separator, check the result in the preview.
If the appropriate file encoding and separator is set, the umlauts and special characters as well as the column division are displayed correctly.
Configure import
When importing the profiles again, set the "unique assignment" and the "duplicate check" to "Profile ID" and click on "Update only". Carry out the import.
With the import, the profiles are enriched with the missing data and the selection characteristic. You can use this characteristic to filter the profiles to be deleted.
Create target group
To filter the profiles that are to be deleted, enter the uniqueness criterion that you assigned to the profiles to be deleted.
Create a target group with the selection criterion. Here: "Delete selection contains". This allows you to select the profiles to be deleted.
Delete profiles
Under the tab "Delete data" you can remove duplicate profiles from the pool. Please keep in mind that if the profiles are deleted, the profile history and the tracking data of the profiles to be deleted will also be lost. If you have accidentally deleted profiles from the pool via target groups, you can restore the profiles via the Backup Center.
Under the tab "Delete data" you can delete the multiple existing profiles from the pool.


